How To Diagnose and Repair a Leaking Toilet
Toilets that constantly run are not just annoying to listen to; they also lead to a much higher water bill. That is why it is important to always make sure your toilet is in good working condition.
Fortunately, diagnosing a leaky toilet is a piece of cake. It can be done in only a few easy steps, and will only take a few minutes of your time. Although not every toilet is the same, most use pretty standard systems that makes universal repair possible. Read our post “How To Conserve Water and Save Money” for more money saving tips.
1) Lift The Toilet Bowl Lid
The toilet flushing components are located inside the rear tank of the toilet. That being said, the first step is to lift the toilet bowl lid, and to gently place it in an area where it will not get broken. Be very careful, the majority of these lids are made of porcelain, and are very fragile.
2) Examine The Inside Toilet Tank
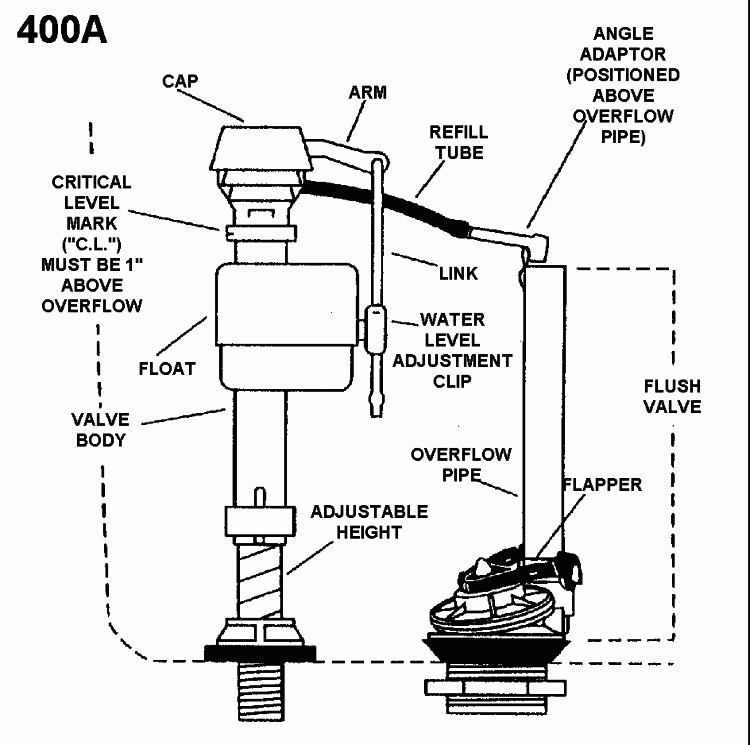
Inside the toilet tank you should see a pretty simple system that can be easily understood to diagnose the problem. The parts consist of a fill valve, an adjustable float (which may be a ball), and a refill tube. Then there is an overflow tube, a flapper, the flapper chain, and the guide rod or handle.
3) Flush The Toilet
Now that you have examined the inside of the toilet tank, flush the toilet and watch what happens. Make sure the small refill tube is connected to the fill valve and the to the top of the overflow pipe. While the tank refills, this tube releases water down the overflow tube to refill the bowl after the toilet is flushed. One common problem is when the fill valve gets weak it will not shut off the flow of water even when the adjustable float has reached its stopping point.
Yet, most often the problem is with the flapper on the bottom of the toilet tank.
After you flush, the flapper should open for a few moments, then settle tightly back down. Is it still open even after the toilet is done flushing? If so, this is the source of your constantly running toilet.
4) Problems With The Overflow Pipe
In the center of the of the toilet bowl is the overflow pipe. Turn the water supply off at the shutoff valve located under the tank on the wall. Now examine the overflow pipe and the base of the flush valve for any cracks. If you find any cracks you will need to replace the overflow pipe. This repair requires you to completely remove the tank from the base. When you purchase the overflow pipe it will have specific instructions to replace it. This is one of the more difficult repairs to make and you may consider hiring a professional plumber to complete this repair.
5) Problems With The Fill Valve
If the tank water has reached the level where it is constantly overflowing into the overflow tube, check the adjustable float and make sure it is in the proper position. If it is set correctly and the water continues to run then the fill valve is bad and will need to be replaced. Turn the water supply off at the shutoff valve located under the tank on the wall. Buy a replacement valve from your local hardware stores or home centers. In many cases, it is not necessary to match the old one especially it you have the ball float type. Most of the newer fill valves are more reliable, and have a longer life span. It’s a 15-minute change-out and the exact directions will be included in the package and vary by type.
6) Problems With The Flapper
Connected to the overflow pipe, you will see flapper guides attached to the outside of the white plastic tube at the bottom. These two flapper guides hold the flapper in place. The flapper is a circular rubber seal, and from the flapper to the guide rod is a chain. This flapper is supposed to be tightly fit to the bottom of the overflow tube. Although the flapper can be the source of the leak, because it is part of the system, the parts attached to the flapper may be the actual cause. Make sure that the metal chain attached to the rod and flapper is not broken, tangled, or so long that it is stopping the flapper from sealing tightly. Replace the chain if it is broken, and wrap it through the middle hole in the guiding rod making sure the chain is just long enough to go from the guide rod to the flapper. If the chain is not the problem, the flapper itself may be your issue. Turn off the water valve at the wall, then drain the water of your toilet tank. Now examine the flapper, and the hole on the bottom of the tank. If it is dirty or has buildups, clean it with a cloth, then try flushing again. If this does not work, then the flapper will need to be replaced. Unfortunately over time the flapper can become warped which prevents it from making a tight seal to the hole, and allows water to leak through. Every flapper package comes with instructions on the package itself. Simply follow the directions and you will have solved and fixed your toilet bowl flapper problem.